Monday, July 11, 2011

The South: A Love Story

I was born and raised in the South (well, except for a few stints in Ohio, Puerto Rico and NY but that is another story). I went to college in the South. I got my first job in Atlanta, the biggest city in the South. When I met my husband, I told him I would live anywhere south of the Mason Dixon line and east of the Mississippi. He thought I was kidding. I am not. And really, where else is a name like Virginia Ann going to go over well? For the sake of my youngest child, we need to stay in the South. To say I love the South is an understatement. I love her people, her literature, her history and most definitely her FOOD! As any upstanding southern lady would, I have had a subscription to Southern Living since I was 16. It was a gift from my Aunt Maureen- a New Yorker, gasp!-who has seen that geography may separate us but we can both agree that this publication should be scripture to all who love the South. 
 The day Southern Living comes in my mailbox is an exciting day. I know that once the little people hit their pillows, I get to curl up and read the magazine cover to cover! My husband is excited because he knows that in the days to follow I will try new recipes and he will be the beneficiary. Such an experience happened last night and I have to share. We had a Southern Summer Supper with lots of yummy foods from the garden- fried okra, cucumber salad and squash casserole among others. We had company over and I was a little nervous to try a new recipe for dessert but SL has never failed me and it exceeded expectations this time! I mean, how could a recipe that includes Mountain Dew go wrong?

Grab the following. It is high time you make Peach Enchiladas!
2 cans of crescent rolls
2lbs fresh peaches
1.5 cups of sugar
1 cup butter, melted
1 tsp cinnamon
1 can of Mountain Dew

Cut up your peaches. The mag says to quarter them. I went a little smaller. 
Lay out the crescents in a buttered baking dish. Place a tablespoon of peaches or a quartered peach on each triangle. Roll up the dough around the peaches and pinch the ends together.
Place the peach pockets point side down in the dish. Mix together the melted butter, sugar and cinnamon and drizzle it over the rolls.
Take the secret ingredient. Ignore your husband's strange looks. 
Pour the Moutain Dew over the rolls. Bake at 350 for 45 minutes or until golden brown and bubbly. (It only took my oven 40 minutes so watch them).
 I wish your house could smell like this right now. 
Put these on your "must make this summer" list. Then send Southern Living a handwritten thank you note. It is what a good Southern lady would do.

Monday, July 4, 2011

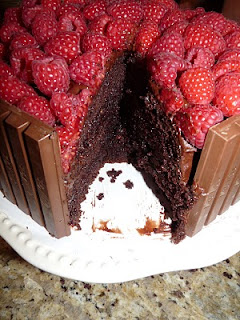
Chocolate Raspberry Kit Kat Cake

Two of my favorite combinations are chocolate and raspberry. There is a deli nearby (NYBD in Cary for you local folks) and Tommy, the owner, makes the most amazing chocolate raspberry cookies. It is a butter cookie with a big ol dollop of raspberry jam on top and then dipped in chocolate. They call them OMG cookies because that is pretty much all you can get out when you bite into one. Tommy only makes them on special occasions and if you happen to be there when he does, buy them. There won't be any left past 9am. Trust me. 

I thought I would share my own version of chocolate raspberry heaven. This cake looks like you spent alot of time on it but it is so easy! You will get rave reviews and set high expectations for next time but let's focus on the here and now. 

Here and now is what you need:
 2 Boxes Chocolate Cake (I prefer Devil's food)
2 Tubs of Chocolate Icing
2 Jars of Smuckers Raspberry Preserves
12 Kit Kats (use regular sized Kit Kats, no snack size)
16 oz of raspberries
Raspberry colored ribbon
Glue or Glue gun

Make the cake according to the directions. Of course you can make your cake from scratch if you are like that and don't have a baby attached to you in the Baby Bjorn. Me, I am short on time and free arms, so I use box cake for now. 
 The two boxes will make three 9 inch round cakes. (I only own two pans so I had to bake in shifts.)
 Lay your cakes out on parchment paper and let them cool completely. 
 Using a serrated knife slice the rounded part of the top making a flat top. You won't need the rounded tops- as you can see I placated a certain two year old with one of mine
 After you slice off the top, then slice you cake in half crosswise, making two layers. Repeat with the other two cakes. You should now have six layers.
 At this point I put parchment paper on my spinny cake plate which makes icing the cake super easy. I got it when I coerced my friends Jenna and Ginny to take the Wilton cake decorating class with me back before we  had no kids and lots of free time. Every Tuesday night for 6 weeks we iced beautiful concoctions and every Wednesday our co-workers were so excited to see us! We all probably gained 10 lbs and I am really no better at icing a cake but I do love my spinny cake plate. 
ANYWAY, place the first layer on the parchment paper and spread raspberry preserves on top. Stack layer #2 on top and repeat with 3, 4 and 5. After you slather on the preserves on 5 place layer # 6 on top.
 You should have something that looks like this. It doesn't need to be pretty- that is the beauty of this cake.
 Now ice the cake with the chocolate icing. Again, don't be nervous. No one will see any of the icing. 

 After I have iced the cake completely, I cut the extra parchment paper around the cake and slide it onto the pretty cake stand I am going to use. This is a big cake and is hard to move once it is complete so do it now.
 Kit Kat time!! Open the Kit Kats very carefully. Broken Kit Kats will not do. I actually use scissors to open them because I have broken too many and had to make a quick trip back to the store!
 Place the Kit Kats around the cake like so. The icing with help them stay upright. 

 Next place the raspberries on top of the cake. I start in the middle and work my way out. 
 Til it looks like this! 
 Now it is time to get your ribbon. Wrap the ribbon around the cake and cut it leaving about 2 inches overlap. Put a dot of glue on the overlap piece, wrap it around the cake and secure the ends. 
 Tada!!!
 You have a cake that is a gorgeous as it is yummy! And it is even better the second day when the preserves have soaked in the cake so hide a few pieces for leftovers. I hope you have an occasion for this cake very soon or no reason at all except raspberries are in season! 
 My reason was for the wonderful father of my three little people! We all enjoyed it and I hope you will to!